

Biscoff Cookie Butter Cheesecake Pops Your new passion is about to become. If you, like me, have ever found yourself staring at a jar of Biscoff spread, or daydreaming about a slice of perfectly creamy cheesecake, prepare yourself for a delightful fusion. These are not just any sweets; They’re miniature creations that capture the soul-warming essence of our beloved Biscoff Cookie Butter in a wonderfully portable and totally addictive cheesecake form. We’re talking about a luscious, spicy cheesecake filling swirled with that irresistible spiced cookie buttercream, encased in a crunchy Biscoff crumb extract coating. The magic lies in the perfect harmony of textures and flavors – smooth, rich cheesecake against the crunchy, sweet cookie crust. They are ideal for parties, any special treats or just when the urge strikes. Get ready to impress yourself and everyone you share these delightful treats with Biscoff Cookie Butter Cheesecake Pops with
Biscoff Cookie Butter Cheesecake Pops: A Dreamy Treat
Get ready to step up your dessert game with these absolutely divine Biscoff Cookie Butter Cheesecake Pops! If you’re a fan of creamy, dreamy cheesecake and the irresistible spicy sweetness of Biscoff cookies, this recipe is your new obsession. These pops are a delightful fusion of two favorite recipes, delivering an explosion of flavor and a fun, bite-sized experience. Imagine you’re scooping out a rich, velvety cheesecake filling with the warm notes of Biscoff cookie butter, all wrapped up in a delightful cookie crust. They’re perfect for parties, a special dessert, or just when you need a little pick-me-up. Let’s dive into making these magical pops!
Material:
Getting Started: Preparing the Creamy Base
The base of our delicious Cheesecake Pops is a wonderfully smooth and creamy filling. To begin extracting, make sure your 8 ounces of cream cheese is at room temperature. This is important to achieve a lump-free, silky-smooth texture. Softer cream cheese blends more easily with other ingredients. In a medium mixing bowl, beat softened cream cheese until light and fluffy. You can use an electric mixer for this, which makes the process faster and more efficient, or use a sturdy whisk and some elbow grease.
Next, slowly add your ½ cup powdered sugar into the cream cheese. Continue beating until the sugar is completely incorporated and the mixture becomes smooth and creamy. Don’t rush this step; A well-mixed base ensures the best taste and texture. Next, we’ll add the warm, inviting essence of vanilla. Add your 1 teaspoon vanilla extract. Its aroma alone is enough to make your kitchen amazing!
With Biscoff Bliss
Now comes the star of the show: Biscoff Cookie Butter! Add your ½ cup Biscoff cookie butter to the cream cheese mixture. This is where the magic really happens. The spicy, caramelized flavor of the cookie butter will permeate every bite of your cheesecake. Beat everything together until it’s completely combined and you get a beautifully homogeneous, creamy mixture. The color will probably darken to a beautiful caramel color.
To make our cheesecake filling light and airy, we will slowly add ½ cup whipped cream. If you’re using Cool Whip, add it straight in. If you are using heavy cream and whipping it yourself, make sure it has stiff peaks for best results. Fold it in gently using a spatula, being careful not to over-mix it. We wanted to maintain that airy lightness. The result should be a surprisingly decadent and slightly airy cheesecake batter.
Assembling Your Cheesecake Pops
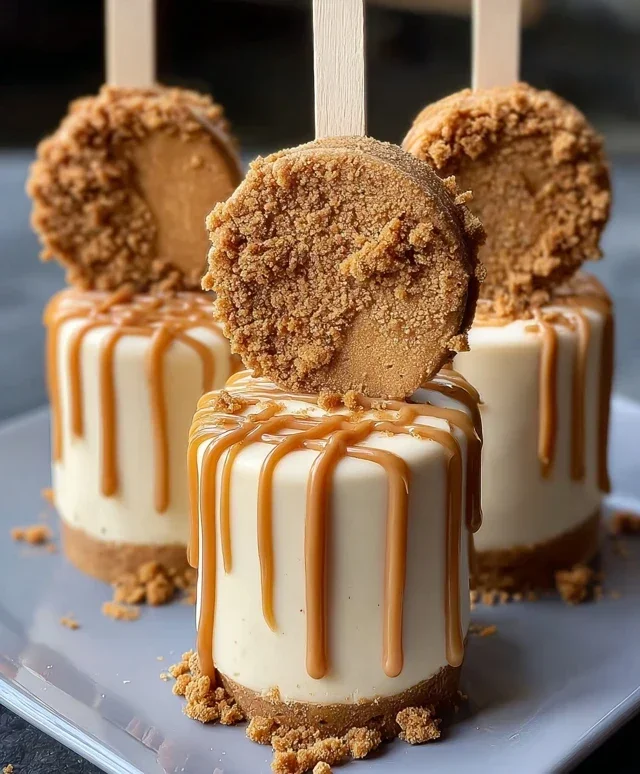
With our delicious filling ready, it’s time to assemble the pops. You will want to have your crushed Biscoff cookies ready in a shallow dish or plate. This will be our happy coating. Take about a tablespoon of the cheesecake mixture and roll it into a ball. The mixture will be soft, so using a small cookie scoop or two teaspoons may help to create equal portions. Gently press a whole Biscoff cookie onto one side of each ball, then press a popsicle stick onto the other side, pushing it about halfway into the ball. The cookie acts as a small “base” and helps the pops keep their shape.
If the mixture seems too soft to handle, you can keep the formed balls in the freezer for about 15-20 minutes. This will strengthen them, making them easier to coat. Once slightly firm, roll each cheesecake ball in crushed Biscoff cookies, gently pressing to even out crumbs. Make sure each pop is well coated for that extra Biscoff crunch. Place coated pops on a parchment-lined baking sheet.
Chilling to perfection
Once all your cheesecake pops are assembled and coated, it’s time to harden them. Place the baking sheet with pops in the freezer for at least 2-3 hours, or until they are completely hard. This cooling process is necessary to maintain their shape and hold the popsicle sticks securely in place. You want them to be solid enough to eat without falling apart.
Serving your Biscoff masterpieces
When your Biscoff Cookie Butter Cheesecake Pops are completely frozen and firm, they’re ready to enjoy! You can serve these straight from the freezer. For an extra touch of beauty and flavor, you can drizzle them with a little melted cookie butter (slightly warm) or sprinkle additional crushed Biscoff cookies on them just before serving. If you think your cookie butter is too thick for drizzling, you can thin it with 1-2 tablespoons of heavy cream. Simply heat the cookie butter gently and whip the cream until smooth. These pops are best enjoyed within a week and should be stored in an airtight container in the freezer. Be prepared for smiles and rave reviews – these Biscoff delights are really something special!
conclusion:
I hope you’re as excited about these Biscoff Cookie Butter Cheesecake Pops as I am! This recipe is a true winner because it combines the incredibly comforting flavor of Biscoff cookies and creamy cookie butter with a rich, luxurious cheesecake. The result is a delightful handheld treat that’s perfect for parties, the dessert table or just a special indulgence. These are surprisingly easy to make, offering a sophisticated dessert without the hassle of traditional cheesecake. Imagine the smiles on your guests’ faces when they bite into these delightful pops! These are served cold, perhaps with a cup of coffee or a glass of milk. For variations, consider adding a drop of melted Biscoff spread or crushed Biscoff cookies on top before freezing. If Biscoff isn’t your only love you can also experiment with different cookie crumb extractables for the base. I really encourage you to try these Biscoff Cookie Butter Cheesecake Pops. They’re guaranteed to please a crowd and are a great way to bring a unique and delicious dessert to your next gathering.
Frequently Asked Questions:
Can I make these ahead of time?
Absolutely! These cheesecake pops are perfect for making ahead. You can store these in an airtight container in the refrigerator for 3-4 days. For longer-term storage, freeze them individually on a baking sheet until solid, then transfer to a freezer-safe bag or container. They will keep well in the freezer for up to a month. Just let them thaw slightly at room temperature before serving for the best texture.
What if I don’t have cookie butter?
While the Biscoff cookie butter is the key to the unique flavor of this recipe, you can replace it with other smooth cookie butters or even mix very finely crushed cookies with a little cream cheese if you like. However, for that distinctive Biscoff flavor, I highly recommend seeking it out!
How do I keep pops from sticking to the mold?
Make sure your cake pop molds are well greased, or for added protection, lightly coat them with non-stick spray. It also helps to let the cheesecake mixture cool sufficiently before inserting the sticks. If you’re using silicone molds, they’re usually quite forgiving and make removal easy.
Biscoff Cookie Butter Cheesecake Pops
Decadent No-Bake Cheesecake Pops are packed with the irresistible flavors of Biscoff cookies and cookie butter, the perfect accompaniment to a sweet treat.
Material
-
8 ounces cream cheese, softened
-
½ cup powdered sugar
-
1 teaspoon vanilla extract
-
½ cup whipped cream
-
½ cup crushed Biscoff cookies
-
½ cup Biscoff Cookie Butter
-
2 tbsp thick cream
-
Perfect Biscoff Cookies
-
additional crushed Biscoff cookies for garnish
-
popsicle sticks
Instruction
-
step 1
In a large bowl, beat softened cream cheese until smooth. Add the powdered sugar and vanilla extract and mix until well combined. -
step 2
Gradually add the whipped cream until no streaks remain. Be careful not to over mix. -
step 3
In a separate bowl, combine crushed Biscoff cookies and Biscoff cookie butter. If the mixture is too thick, stir in the heavy cream until it reaches a spreadable consistency. -
step 4
Slowly stir the cookie butter mixture into the cream cheese mixture until completely combined. Avoid over mixing to maintain a light texture. -
Step 5
Prepare your popsicle molds or small muffin liners. Insert a whole Biscoff cookie into the bottom of each mold/liner, pressing slightly. -
Step 6
Spoon the cheesecake mixture onto the cookie base, filling each mold/liner. Insert a popsicle stick into the center of each pop, making sure it is completely submerged in the mixture. -
Step 7
Refrigerate for at least 4 hours or until firm. Once frozen, carefully remove the pops from their molds. Garnish with additional crushed Biscoff cookies before serving.
important information
Nutrition Facts (per serving)
It is important to consider this information as approximate and not to use it as definitive health advice.
Allergy Information
Please check ingredients for potential allergens and consult a health professional if in doubt.